Creating A Customer Support Intelligent Assistant
What is this guide for?
This guide will show you how to create an intelligent customer support bot, capable of detecting the problems users present to it and reacting accordingly.
This guide will only show how to create a bot with only one detectable problem, though the steps can be repeated for any new problem you want the bot to detect.
Step 1: Greeting The User
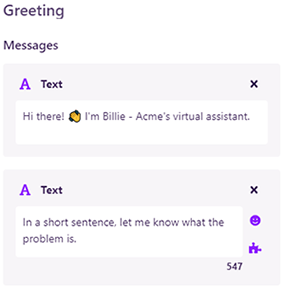
The first thing we want our bot to do is greet the user.
Create your bot, name it whatever you like, and add your first Flow. This Flow will be our entry point for the user, so make sure it's set as the entry point and name it something significant.
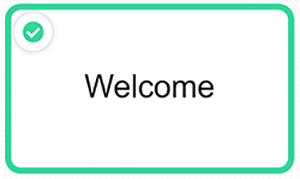
Viewing the inside of the 'Welcome' flow, we have the ability to add Elements to the bot. For this flow, add a single message thread. Click into the just created element and add a few words for the bot to say.
Make sure that the 'Welcome' Flow has no navigation targets connected throughout the entirety of the guide. If connected via Continue To or Menu, the system built in Step 2 will not work.
Step 2: Detecting The Issue
This step is all about setting up the detection of problems for our bot. This is the longest and most complex step.
Once you've set up your welcoming flow, its time to make our bot understand the things users say. On the side of the page, click the "Intergratons" button. We want to intergrate DialogFlow with our bot which we made a guide on how to do!.
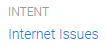
After intergrating the bot, we will want to head back to DialogFlow's API manager and find the agent we've made. In "Intents", click the create intent button and name it something. If you havent already, delete the default intent but do not delete the default fallback. (If you do, you can create a new one in the options at the top right.)
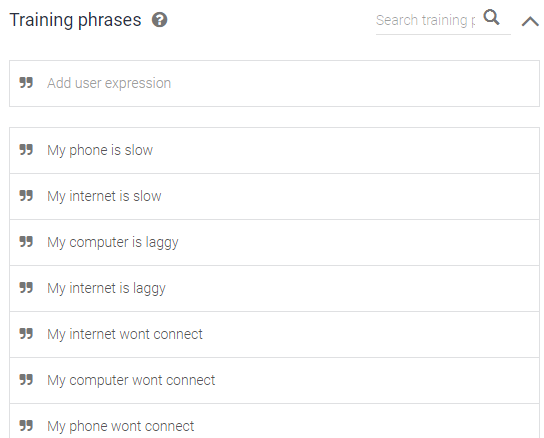
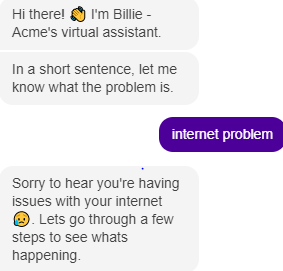
Going into the intent you've just made, we want to add some training phrases. These phrases should be fairly common things people would say to your bot.
After writing a few training phrases for our agent, save and click on the Entities tab. Create an entity and enter its menu. There will be two options for a table, the left being the first one we will edit. This field lets us type in a word, which should be an important word you want the bot to recognise. The second field on the right should be filled with different synonyms for the word we entered on the left. Fill as many of the rows as you want and save the entity.

After saving the entity, try typing one of the words you entered into the text box near the top right corner. If the response recieved is the fallback, then something has gone wrong and your agent did not detect what you said.

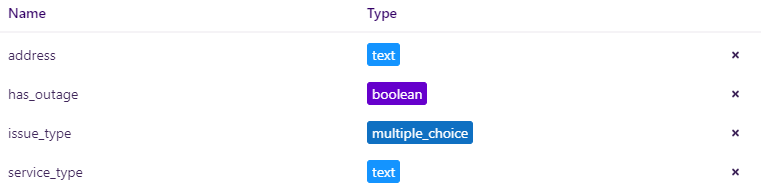
After that's complete, we can return to Stackchat. We now want to enter the 'Slots' modal on the left and create four of them. Your slots should be set up as follows.
Slot 1: A slot for adressess, set to text.
Slot 2: A slot for checking a variable, set to boolean.
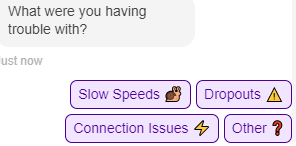
Slot 3: A slot for the issue type, set to multiple choice.
Slot 4: A slot for the service type, set to text.
Going back to the bot editor, create a new Flow and name it something related to the issue your bot will detect. Click it and go into Configure AI, which will show an empty window.
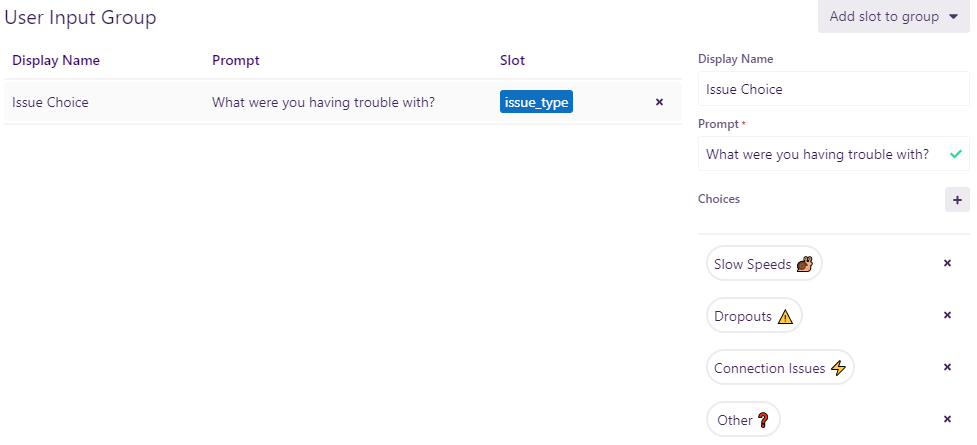
Create a new intent and name it the exact same thing as your intent in Dialogflow. Do the same for the entity. Set the slot to the multiple choice slot you created and close the window.

Click on the now yellow flow and enter it, creating an action Flow and Message Thread.
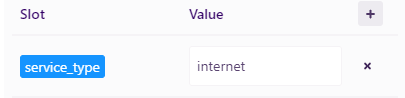
Inside the action flow, have the slot used for service type change to the issue the bot will detect.
Inside our Message Thread, we want the bot to first display courtesy to the user, then proceed with problem solving. Add a text box, then add a user input box. Inside the user input box, add the multiple choice slot we made earlier and add a prompt. You now have the ability to add in different responses the user can select.
At this point, there should be no errors in the bot logic, allowing us to publish the bot. When the bot publishes, you should see a new icon in the bottom right of the bot builder.
![]()
Clicking on this icon allows us to chat with our bot. We want to make sure that our Dialogflow API is working with the bot correctly, so try answering with a keyword and without one.
And with a working Dialogflow NLP agent, we have completed the hardest part of this bot.
Step 3: Responses
We are getting close to finishing the bot, but we still have two more Flows to create and fill.
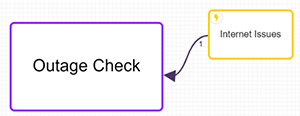
The first of those two Flows will be named after something your support bot will check for. (In our example bot, it's a power outage). Before we do anything with this Flow, we need to have the message thread we created in the previous Flow link to our just created one.
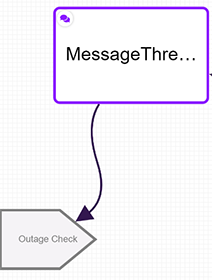
Once that is done we can enter our new flow. We will want to add the following Elements to the flow:
A Cloud Function, a Branch and two Message Threads. Before we touch those Elements, we want to go into the Cloud Functions page and add a few lines of code. The code you add into the cloud function should be able to check a variable. (If you don't know how to do that, use our code below!)
function checkForOutage() {
  const a = new dc.ActionSequence();
  const setSlot = new dc.SetSlotsAction();

  if(Math.random() > 0.5) {
    setSlot.slots = { has_outage : true }
  } else {
    setSlot.slots = { has_outage : false }
  }

  a.actions = [ setSlot ];
  return a;
}

module.exports = { checkForOutage };
function hello() {
    return 'Hello world!'
}
After completing your code, return to the Cloud Function and assign whatever you called the function. After it has been assigned, enter the Branch Element.
We want to make sure the following things are done inside the branch:
All conditions should be satisfied
Under conditions have it set out that your boolean is set to a value true
If the criteria is satisfied, the user is redirected to one message thread.
If the criteria is not satisfied, the user is sent to the other message thread
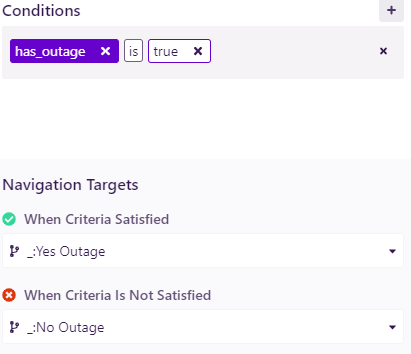
You should now see two different lines going into the different Message Threads, a green one and a red one. These show us where the bot redirects based on the fulfillment of the Branch output.
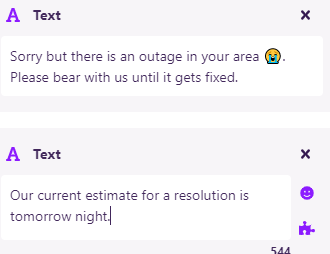
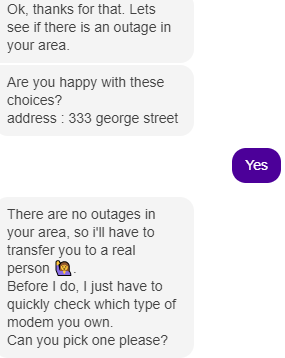
Entering into the thread connected with a green arrow, we can add a few lines explaining that our bot has detected the problem as true. Our bot has solved the problem, so we can leave this message thread as a dead end.
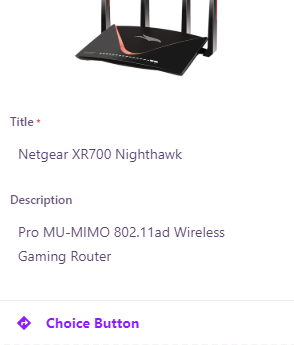
Exiting that thread and entering the thread connected by the red arrow, we want to add a text box and a list. The text box can be a simple message explaining that the problem cannot be handled by our bot, but the list is going to be something to help the human assistant when the conversation is redirected to them.
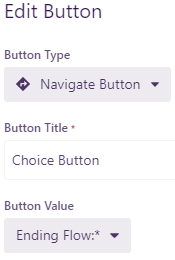
For our guide, we gave users the choice of different types of modems. In your list, create three different cards all with a navigate button. Leave this button blank for the moment, we'll come back and link them in step 4.
Step 4: Finishing Touches
We've now reached the final step in creating our bot, making it say goodbye!
Go back to the top level of the bot builder and create a new Flow, aptly named something like "Goodbye".
Inside this Flow will be a single Message Thread. Add in a bit of text so the bot says goodbye, and you're almost done!
We now want to go back to the two message threads we made in step 3, and add navigation to our ending text. For the thread containing the list, that means we edit the card's navigation buttons.
To check we have done everything correctly, publish the bot and test it.
If you want, you can expand upon this bot by adding different things for it to detect (done by adding different intents in Dialogflow and creating new flows for the bot to follow). Or, if you like, you can leave the bot with only one intent to detect. Either way, you have created your own customer support bot, congratulations!